Equipment and Software
A brief primer on deep space imaging
Generally in astrophotography there are a dozen different disciplines, depending on what sort of images you want to produce. I focus on what I consider “the hard stuff” - deep space objects, at high resolution. These are very dim objects, invisible to the naked eye. The atmosphere is generally my limiting factor, if I get all the rest of it right.
Unlike taking photos of planets, which can be done with shutter speeds as low as 1/200th of a second with a good telescope, most of my images are composites of hundreds of images, often called “subframes”. Each subframe typically is a two to five minute long exposure, meaning each image I produce often has many hours of exposure time to capture enough signal of faint objects to make clear, low-noise images.
Imagine pointing your camera at the same object in the sky, as it moves across our field of view, for 5 minutes at a time, with a stability of less than 1/60th of 1/60th of a degree of arc. That’s what I need to do to stand a chance of good data!
While making all the mechanical tracking bits as good as you can is important, my imaging is also actively guided by a second camera taking half-second exposures, using light “off axis” from the main camera from a prism, and so looking through the same telescope. This is used to correct the mount while the main camera takes an exposure.
Hardware - Optical and Mechanical
I’ve gone through quite a few iterations of equipment but all based on the same platform.
I’m currently shooting on a modified Sky-Watcher 200PDS telescope, mounted on a modified Sky-Watcher EQ6-R Pro German Equatorial Mount.
The telescope has a Baader Steeltrak Diamond focuser, driven by a Primaluce Labs Sesto Senso focus motor. Contrast has been enhanced through internal flocking, a custom rear tube blackout cap, and an Astrozap dew shield is fitted in use.
The mount’s been modified with new SKF bearings and been shimmed precisely for stability. I’ve also polished and cleaned internally all contact surfaces and gears, and relubricated with high-quality stable lithium lubricant. It lives outside, so I’ve also replaced everything I can with stainless steel parts for corrosion resistance.
Hardware - Imaging and Compute
The telescope is a reflecting Newtonian telescope, with a 200mm aperture and 1000mm focal length, making it an f/5 system.
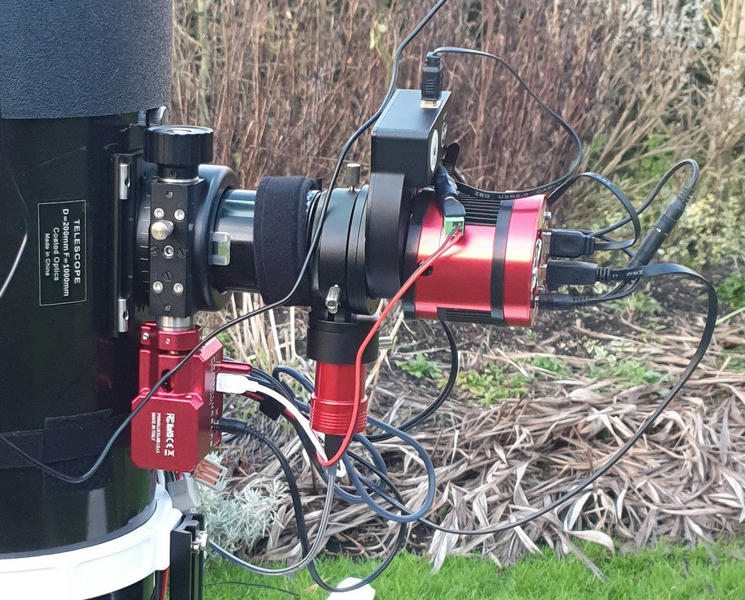
Side view of the imaging train, showing focuser, off-axis guider, filter wheel, and cameras
The imaging train consists of:
- Tele-Vue Paracorr coma corrector, correcting the nautral field curvature of the Newtonian system
- ZWO Off Axis Guider pickoff prism, supplying light to ZWO ASI174MM-Mini
- ZWO Mini Filter Wheel (5-position 1.25“), filtering imaging light
- ZWO ASI183MM-PRO imaging camera
All the cameras are monochrome, with no Bayer filter. For guide imaging we just use wideband light, but the main camera sits behind a computer-driven filter wheel which holds optical filters - giving luminance (essentially the full visible spectrum), red, green, and blue filters. I also have a narrow-band filter for the hydrogen alpha emission line. Combining the subframes captured with each set of filters gives a full colour image.
Strapped to the back of the telescope with Velcro is a small box containing a Raspberry Pi 3B and a USB hub, plus some power distribution and a 12V-5V step-down. Dew heaters are fitted on the Paracorr and camera, and driven based on sensors.
Software - Capture and Control
I use an open source software stack for capturing images and managing the telescope’s pointing and guiding.
The INDI project is used for harware interfacing, and provides access to the control system via a network interface.
I’m currently using the KStars/Ekos platform for control and planning, which works very well but can suffer from stability issues. I run this on a Raspberry Pi in the warm. PHD2 is used for active guiding.
Software - Processing and Data
I work entirely within the PixInsight platform for image processing, which involves several typical steps:
- Calibrating raw data, using correction data and calibration files I collect when I’m not imaging
- Processing data to remove technical artifacts, like hot and cold stuck pixels
- Selecting the best data and rejecting anything with problems (like clouds, or satellite trails)
- Aligning all the image data, correcting for mirror sag and other mechanical variation between imaging sessions
- Combining each set of filters’ subframes into a stacked image
- Removing atmospheric effects such as sky glow from the image data
- Combining each filter’s stacked image into a colour image
- Applying colour correction, any creative adjustments, and noise reduction
This process can involve hundreds of gigabytes of raw and intermediate data, and thousands of files, and takes anywhere from a few hours to days of time, plus days to weeks of processing time. My archive of raw data is many terabytes in size, since I keep years of data for future use!
I’ve also written my own tools to keep track of all my data and manage it locally, so I can easily add to my data for a target over time and export all the required data, calibration files, and reference links directly into PixInsight.